How to Draw Mountains Using Simple Shapes
22 de outubro de 2026
Learn how to draw mountains using simple geometric shapes. Easy step-by-step guide to creating landscapes and free coloring pages to print! 🏔️🎨
The Geometric Foundation of Drawing Mountains
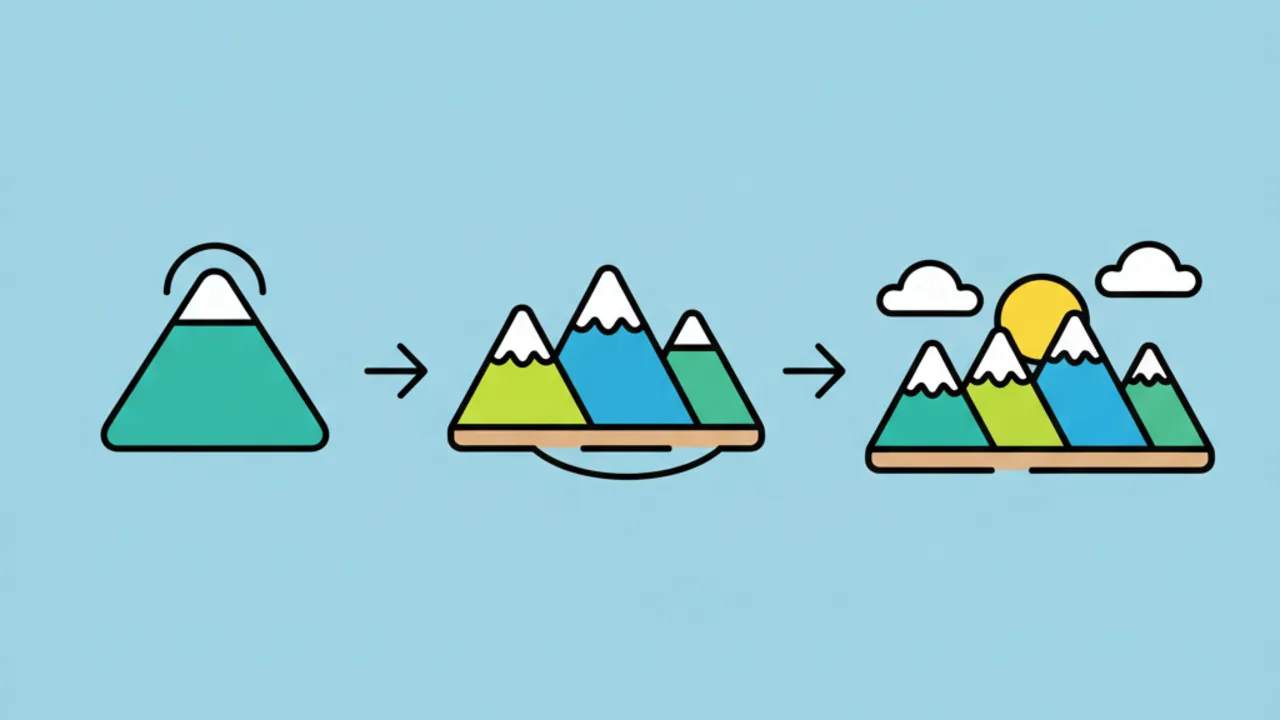
To learn how to draw mountains like a pro in a simple way, the secret is looking at nature through geometric shapes. Most major mountain ranges can be simplified into basic triangles and trapezoids. By mastering these shapes, you create a solid foundation for your own custom coloring pages.
Start by sketching triangles with different heights and widths. At Desenhando e Colorindo, we always encourage budding artists not to chase perfection with the first line. Real mountains are imperfect, rugged, and full of varied textures, which makes the process of coloring and printing pages much more fun and relaxing.
When sketching your initial outline, think about depth. Draw smaller, lighter triangles in the background and larger, more detailed shapes in the front. This perspective technique transforms a flat sketch into a true piece of 3D line art for kids or adults, ready to be filled with vibrant colors.
Quick Tip: Use a light HB pencil for your first triangles. That way, when you finish your art for printing, you can erase the guide lines without leaving marks on the paper.
Exploring the Triangle as the Main Structure
The triangle is the basic unit of any mountain range. To make your coloring drawing interesting, vary the angles. Some mountains might have rounded tops, while others, like snowy peaks, require sharper, pointier angles.
Remember that in nature, we rarely see a perfect triangle. Add small breaks in the side lines to simulate slopes and cliffs. This adds realism and makes the coloring for kids experience much more educational, teaching them about geographic relief while they have fun with their colored pencils.
Shading Techniques to Add Volume to Mountains
Once you've defined the outline, the next essential step in how to draw mountains is working with light and shadow. Shading defines where the sun hits and where the secrets of the rocks are hidden. In educational drawings, this helps children understand concepts of lighting and volume.
Divide each triangle in half with an irregular line running from the peak to the base. Choose one side to be the light face and the other to be the shadow face. If you are creating a digital coloring book or a printable sheet, leave one side completely blank and add hatching (small strokes) to the opposite side.
This hatching technique is great for AI-generated drawings or hand-drawn ones, as it creates a visual texture that mimics stone and ice. The closer the lines, the darker the shadow. This is one of the most effective ways to create cute drawings of landscapes that seem to jump off the page.
Using Cross-Hatching
For deep shadow areas, use the cross-hatching technique. Draw lines in one direction and then cross them with lines in the opposite direction. This creates a rich contrast, ideal for those looking for printable art with a slightly more advanced but still accessible level of detail.
Adding Snow and Vegetation Details
Mountains look much more charming when we add seasonal elements. You can imagine mountains with melting snowcaps and bases filled with green pine trees. These details enrich the coloring activity.
To draw snow on the peak, make zig-zag lines below the main summit. This gives the impression that snow is flowing down the rock crevices. Leave this space white in your free printable coloring page so that the contrast with the blue sky makes the mountain stand out.
- Snowy Peaks: Use broken lines to mark the ice area.
- Base Vegetation: Draw small irregular triangles at the base to represent pine forests.
- Rocky Paths: Add small circles and ovals to simulate boulders and paths.
- Ridge Lines: Connect different peaks with soft lines to form a continuous range.
These elements transform a simple drawing into a full scene. If you enjoy online coloring, these details allow you to use different fill tools, creating gradients that go from the white of the ice to the dark green of the mountain forests.
How to Create Depth and Perspective in the Landscape
Perspective is what separates an amateur drawing from professional line art. To create depth in your mountain landscape, you must apply the rule of overlapping. Draw one mountain slightly in front of another, hiding part of the base of the mountain behind it.
Also, consider the atmosphere. In real landscape drawings, distant objects appear lighter and less detailed. In your free drawings for Desenhando e Colorindo, you can represent this by making the lines of the background mountains thinner and with fewer internal details.
Adding elements in the foreground, like a large tree, a lake, or a small cabin, helps give the mountains scale. This makes the mountains look massive and majestic, capturing the imagination of anyone doing the coloring activity.
Creating a Focal Point
Choose one mountain to be the protagonist. It should be the largest, the most detailed, or the one positioned in the center. The other mountains serve as support to guide the viewer's eye to this main point. This makes the printable drawing much more visually balanced.
Recommended Materials for Drawing and Coloring
To get the best result following this tutorial on how to draw mountains, your choice of materials is key. While you can use any paper, for printing free drawings, we recommend paper weights above 90g to prevent marker ink or pencil pressure from damaging the sheet.
- Graphite Pencils: HB grades for sketching and 2B or 4B for dark shadows.
- Fineliners: Great for finalizing the outline of kids' line art.
- Watercolor Pencils: Perfect for creating sky effects and soft shadows on rocks.
- Precision Eraser: Essential for creating small highlights in the snow.
Having the right materials turns coloring for kids into a real art class, stimulating fine motor skills and visual perception. On the Desenhando e Colorindo website, we have several guide options to help on this creative journey.
Stylizing Mountains: From Realistic to Cartoon
You can adapt your how to draw mountains technique depending on the style you want to follow. If the goal is to create cute drawings for small children, use more rounded lines and add happy faces (Kawaii style) to the mountains. This makes the coloring page much more appealing to a younger audience.
For a more realistic or adventure style, focus on sharp angles, dramatic shadows, and lots of stone textures. This style is highly sought after by adults looking for coloring pages to print as a form of therapy and relaxation, as it requires focus on the tiny details of cracks and shadows.
Printing Tip: When printing your final art, make sure to set the printer to "High" or "Photo" quality. This ensures that the fine lines of your mountain don't disappear during the process.
Finishing Your Art for Desenhando e Colorindo
After finishing the drawing, you can scan it and share it with friends or even create your own digital coloring book. The important thing is to keep practicing. Mountains are versatile themes that pair well with starry skies, sunsets, or foggy mornings, offering endless possibilities for online coloring or on paper.
Don't forget to add the surrounding scenery. Fluffy clouds, a radiant sun, or even a few birds flying in the distance help provide context to the greatness of the mountains you just learned to draw. Every added element is a new opportunity to use different colors and explore your creativity.
Frequently Asked Questions
What is the easiest way to start a mountain drawing?
The easiest way is starting with simple triangles. Draw three or four overlapping triangles of different sizes. Then, just make the straight lines irregular to give it a natural rock look, and there you go—you have the base of a mountain.
How can I give the drawing a rock texture?
To add texture, make small, short, irregular lines or dots in specific areas, especially near shadow zones. This creates the illusion of rugged surfaces and cracks in the stone, making the coloring drawing more realistic.
What colors should I use for mountains?
While gray and brown are classics, mountains can have shades of blue (due to distance), purple at sunset, or green if covered by forests. Use white or very light blue for snowcapped areas at the top.
How do I draw distant mountains?
For distant mountains, draw only the silhouette with very soft lines and little to no internal detail. The further away the mountain is, the fewer vibrant colors and contrasts it has, tending toward a bluish or grayish tone.
Now that you've mastered the technique of how to draw mountains, it's time to get to work and create your own amazing landscapes. Take the chance to explore all the content on Desenhando e Colorindo, where you'll find thousands of free printable coloring pages to practice your painting and have fun with the whole family. Grab your pencils, pick your favorite template, and start creating right now!
Escrito e revisado por Armando Amaro
Fundador do Desenhando e Colorindo. Todo artigo passa por curadoria e revisão humana antes de ser publicado.